Smooth Screen Transitions on React Native + SVG + Lottie
2021-02-15React Native E2E Tests with Detox and Mocha – Step by Step
For a long time, I thought that automated tests were unnecessary, that the time spent implementing them could be invested in new features, which could bring better experiences for users.
This way of thinking may even work for some time, however, nightmares begin when the following word begins to be pronounced with some frequency: SCALE.
The app never reaches a ” state of completion ” what we can conclude are the demands. The app is always evolving, in other words “getting fat”.
Keeping half a dozen screens and components is simple, but what about when you jump to 80 or 100 items, between screens and components, and with activities divided between two or more developers?
Note : The link to the project repository is at the end of this post.
The moment of repentance
It is at this point that you regret not having started the project including the automated tests and think that everything is lost.
The good news is that in most cases, it is still possible to include tests without the need for very significant changes to the code.
E2E Tests in React Native with Detox and Mocha

Detox is a test and automation library for mobile applications, which can be run on the simulator/emulator or on physical devices.
Updated instructions for installing and configuring Detox are available at this link, in case something has already changed by the time you are reading this post.
1) Globally installing the Detox command-line tools:
npm install -g detox-cli
2) Installing platform-specific dependencies. (In this example using ios):
- Installing Xcode Command Line Tools
xcode-select --install
- Installing AppleSimulatorUtils (a collection of utilities for the simulator) using the Brew package manager.
brew tap wix/brew
brew install applesimutils
3) Including Detox in your React Native project:
- Installing Detox as a developer dependency:
yarn add detox -D
- Installing the Test Runner Mocha.
yarn add mocha -D
- Building the test environment with mocha
detox init -r mocha
The e2e directory and the configuration file will be created at the root of the project.
detox[51026] INFO:  [init.js] Created a file at path: e2e/.mocharc.json
detox[51026] INFO:  [init.js] Created a file at path: e2e/init.js
detox[51026] INFO:  [init.js] Created a file at path: e2e/firstTest.spec.js
detox[51026] INFO:  [init.js] Created a file at path: .detoxrc.json
4) Configuring the Mocha runner:
Now let’s edit the .detoxrc.json file that was created at the root of the project.
Note: Note that in this example, the .detoxrc.json file has the name of my project, E2ETest.app. All you have to do is replace the name E2ETest with the name of your project.
{
  "testRunner": "mocha",
  "runnerConfig": "e2e/.mocharc.json",
  "configurations": {
    "ios": {
      "type": "ios.simulator",
      "name": "iPhone 11",
      "binaryPath": "ios/Build/Products/Debug-iphonesimulator/E2ETest.app",
      "build": "xcodebuild -project ios/E2ETest.app.xcworkspace -scheme E2ETest.app -configuration Debug -sdk iphonesimulator -derivedDataPath ios/Build"
    },
    "android": {
      "type": "android.emulator",
      "binaryPath": "SPECIFY_PATH_TO_YOUR_APP_BINARY",
      "device": {
        "avdName": "Pixel_2_API_29"
      }
    }
  }
}
5) Defining the identifier of the element to be tested:
To refer to the elements present in the code, Detox uses methods that distinguish each element, these methods are called Matchers.
There are several methods (Matchers) that can be used to refer to the element, however, in the following example, the Matcher used is by.id (id), whose identifier can be defined by the testID, property, present in React Native.
<Input
    testID="loginInput"
    value={email}
    label="E-mail"
    placeholder="Place your e-mail"
    onChangeText={(nextValue) => setEmail(nextValue)}
    style={{ paddingBottom: 30 }}
/>
Tip: I’m used to setting the props to the “camelCase” pattern, and I often get confused, putting testId instead of testID. If your test shows errors like “ Error: Test Failed: No elements found for“ MATCHER (identifier: (..) “, it could be that the name of the prop is wrong.
6) Writing the test file:
When we started Detox there in step 3, a folder called “ e2e ” was generated at the root of the project, and inside it, a file called “ firstTest.spec.js ” was generated.
It is this file that we will edit to achieve our test objectives.
Below you have a model of the test file:
describe('Login flow', () => {
  it('should fill the e-mail', async () => {
    await element(by.id('loginInput')).typeText('[email protected]');
  });
});
In this line, we are saying “go to the element whose testID property is the same as loginInput. Then type the text [email protected] “.
To make the test a little more complete, I added a few more elements to the firstTest.spe c .js file :
describe('Login flow', () => {
  it('should fill the e-mail', async () => {
    await element(by.id('loginInput')).typeText('[email protected]');
  });

  it('should fill the password', async () => {
    await element(by.id('passwordInput')).typeText('myawesomepassword');
    await element(by.id('toggleSecureEntry')).tap();
  });

  it('should tap login button', async () => {
    await element(by.id('submitButton')).tap();
  });
});
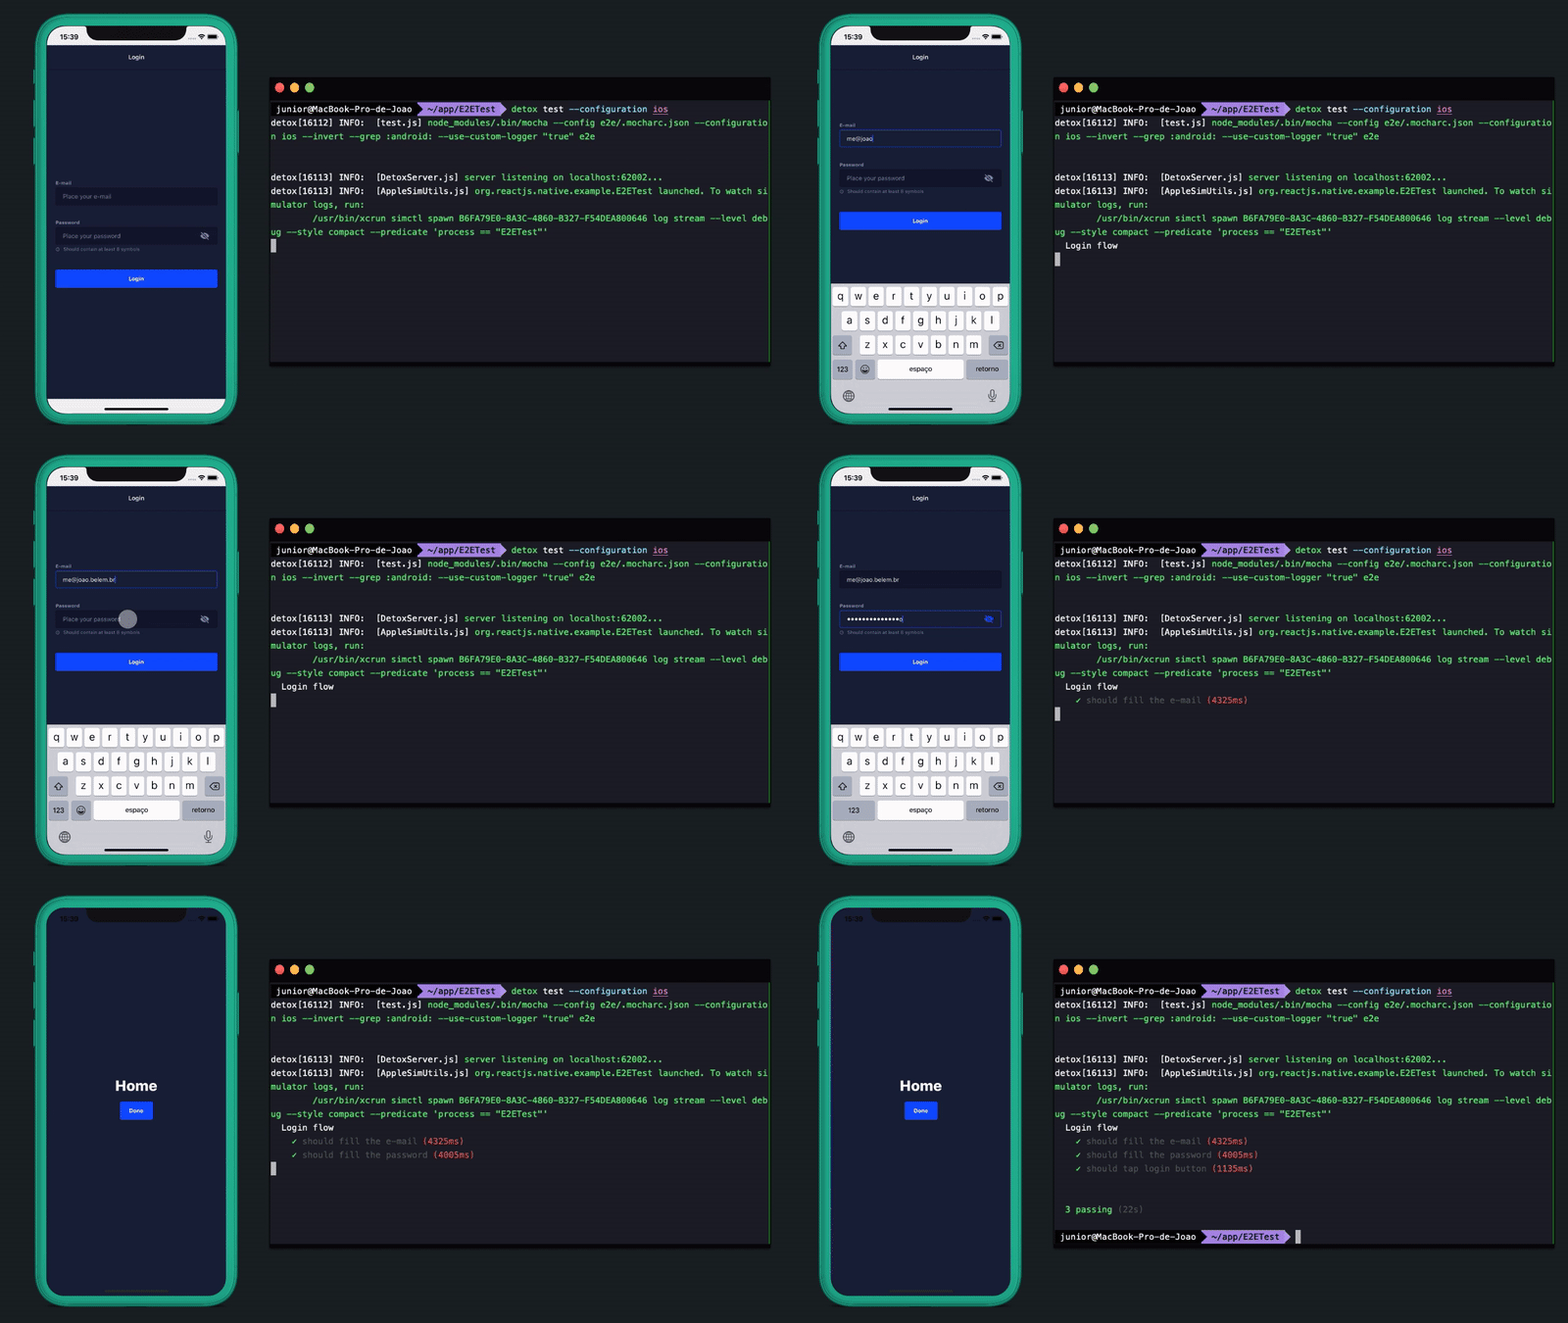
7) Running the test:
Open a terminal in the project’s root folder and run the following command:
detox test --configuration ios
Note: Because the approach of this post is based only on the IOS platform, the flag “–configuration ios” were added, thus restricting the tests to the simulator only.
Tests results:

Completed work!
This is the basis for starting E2E tests, I recommend that you read the Detox documentation and follow the evolution of the library, as it may be that when you are reading this post thing has already changed.
Link to the repository on Github:
https://github.com/Jojr/e2e-tests-detox-react-native/

